Creating high-quality videos with Runway Gen-4 involves carefully structuring prompts to leverage the model’s advanced capabilities in maintaining consistent characters, locations, and objects across scenes. This guide provides practical techniques and extensive examples for crafting precise, creative, and effective prompts.
The Differences Between Runway Gen-3 and Gen-4 Video Models
Runway Gen-4 introduces notable advancements over the Gen-3 model, primarily in terms of character and object consistency across multiple video shots. While Gen-3 was effective at maintaining stylistic coherence, it struggled to depict realistic continuity of characters and objects, often resulting in sequences that felt thematically connected but visually inconsistent. Gen-4 addresses this limitation by enabling users to upload single reference images of characters or objects, ensuring their consistent appearance across different scenes and varied lighting conditions.
Prompt structuring recommendations by Runway are similar between the two models, Gen-4’s integration of multiple reference images gives you greater control and precision in video generation.
Start with an Image
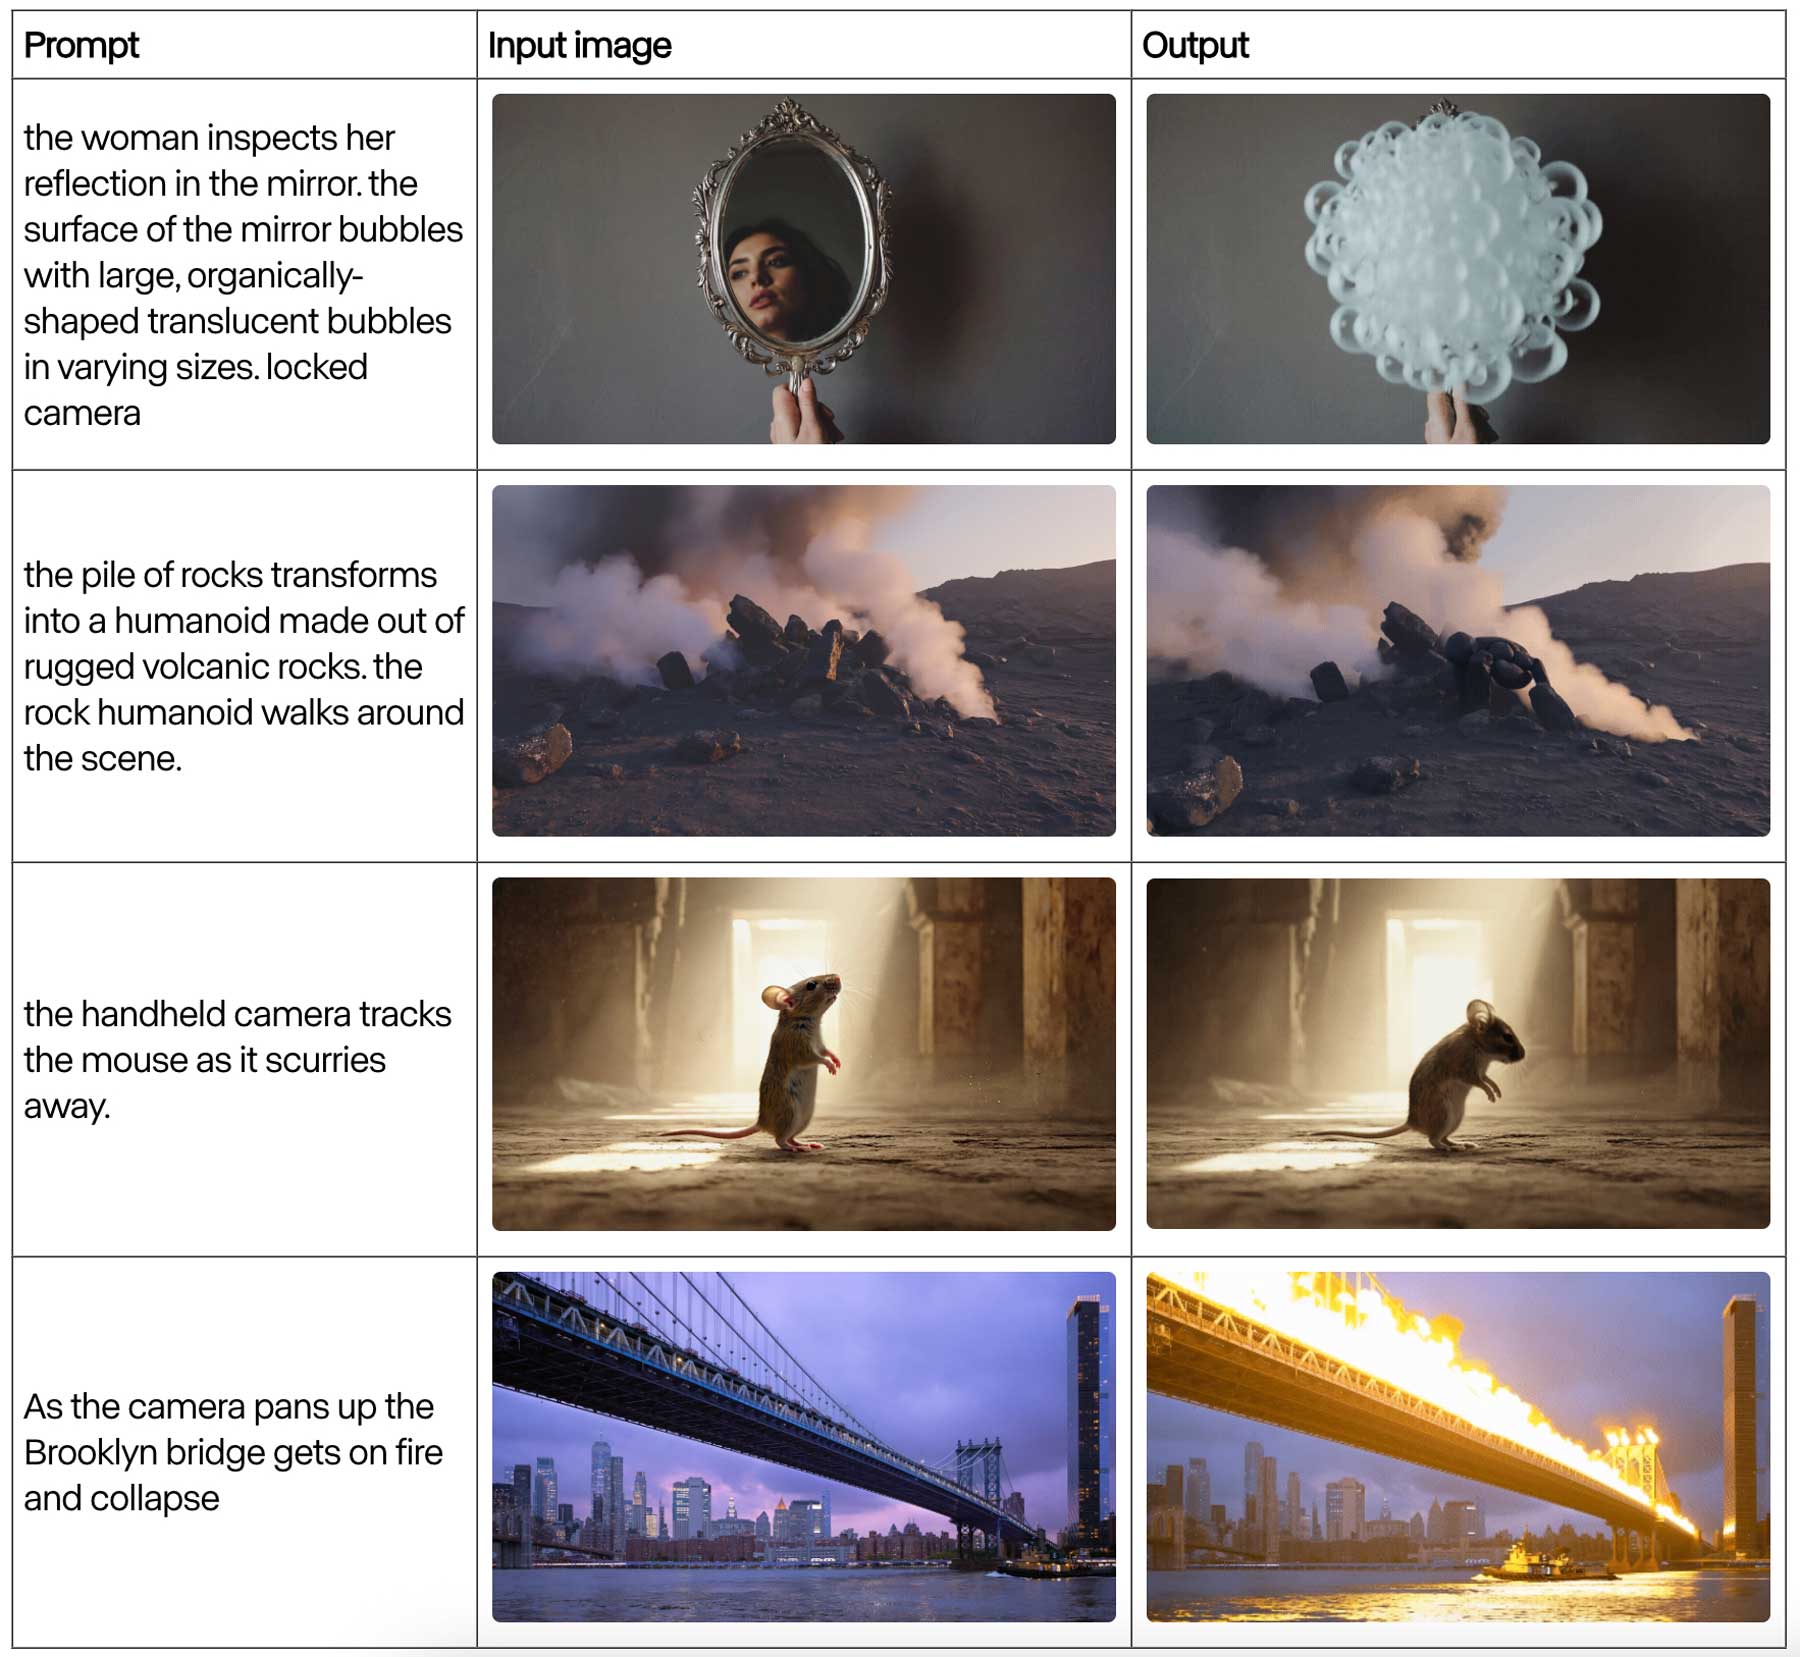
In Runway Gen-4, the input image serves as a visual anchor alongside the text prompt by signaling key details such as subject appearances, framing choices, lighting conditions, color schemes, and stylistic preferences.
Using images rather than purely text-based prompts has a few advantages. Images are faster to generate than full videos, making it easy to explore various visual ideas. Creators can utilize tools such as Midjourney, GPT-4o, or Runway’s own image generator to reduce experimentation time and costs.
Compared with a text to video generator, and image generator gives you much more control. With seed numbers and reference visuals, you can consistently replicate distinctive artistic styles, specialized visual effects, or recognizable character designs across different shots.
Structure Your Prompt
The order in which you arrange different elements in your prompt significantly influences both clarity and the quality of your results. A concise, carefully ordered prompt makes it easier for Gen-4 to interpret your intentions accurately translate them into coherent visuals.
Begin your prompt with the central subject motion, with the primary action that your character or object should perform. Next, detail the scene or environmental elements, and then describe how the surroundings react or enhance the main subject’s action (if any). Then introduce specific camera movements or framing details, such as “handheld camera,” “locked camera,” “slow dolly-in,” or “panning shot.”
For example, rather than beginning a prompt with stylistic terms, such as “Cinema noir style shot of a man walking,” you achieve clearer, more consistent results by structuring the prompt like this: “A man walks slowly across an empty street beneath street lamps. Locked camera shot.
A few of the Gen-4 prompt examples provided in Runway’s Gen-4 Prompt Guide deviate from the recommended ordering of subject and motion, scene description, camera motions, and style ordering.
Start Simple, Iterate Gradually
When creating prompts for Runway Gen-4, start with a simple description of the intended motion and refine it gradually. Begin with a foundational prompt like, “A woman walks through a garden,” ensuring the primary action is visualized clearly. Once satisfied, progressively introduce additional elements such as detailed subject motions (“A woman walks gracefully through a garden, touching flowers”), environmental interactions (“flowers gently sway in the breeze”), specific camera movements (“A handheld camera follows a woman walking gracefully through a garden”), and finally, stylistic descriptors (“cinematic live-action”).
Always Use Positive, Direct Phrasing
Always use positive and direct phrasing in prompts, explicitly stating what should happen or appear in the video. Avoid negative or vague wording, as it can cause ambiguity in the model’s interpretation. For instance, instead of writing, “The camera doesn’t shake,” clearly instruct, “Locked camera remains steady.”
Describe Specific Physical Actions
Describe precise physical actions rather than abstract or conceptual ideas. Specificity ensures accurate interpretation by the model, enhancing the clarity and effectiveness of the resulting motion. For example, rather than stating, “He expresses sadness,” describe concrete actions such as, “He lowers his head and closes his eyes.”
Focus on Motion, Not Detailed Visual Descriptions
Additionally, focus on clearly describing new actions or movements, rather than repeating detailed visual elements already provided by input images. Over-describing visuals can confuse the model or reduce clarity in generated motion. Instead of reiterating details such as, “The girl with red hair in a yellow dress waves her hand,” simplify the description to, “The girl waves enthusiastically,” allowing the model to concentrate fully on the intended motion.
Parts of a Runway Prompt
1. Subject Motion
Subject motion clearly defines how characters or objects within your scene should behave, move, or interact. It encompasses a wide range of actions, including physical movements, facial expressions, gestures, and posture. To optimize clarity and avoid confusion, use general references such as “the subject,” “the figure,” or basic pronouns like “she,” “he,” or “they.” For instance, instead of repeating visual details that may already be present in your input image, use direct yet general phrasing: “The subject walks forward slowly,” or “She raises her hand.” This method enables the model to focus on accurately interpreting the intended motion rather than reprocessing existing visual specifics.
When multiple characters or objects are involved, it becomes particularly important to distinguish between them clearly. To effectively direct distinct actions, use explicit positional or descriptive terms. Positional descriptions might look like, “The subject on the left stands still, while the subject on the right moves forward.” Alternatively, simple descriptive identifiers also work well: “The woman nods thoughtfully. The man waves enthusiastically.” This clear differentiation helps the model easily identify and accurately apply motion to each individual subject.
2. Scene Motion
Scene motion details how the surrounding environment reacts or changes in response to the subject’s actions, or even independently. Effective scene motion can significantly enhance visual realism and immersion. There are two primary ways to communicate scene motion clearly:
- Insinuated motion: Incorporate descriptive adjectives or subtle context clues directly within the action, such as “The subject runs swiftly through a windy forest,” which naturally implies environmental interaction.
- Directly described motion: Explicitly state environmental changes separately from subject actions, like “The subject runs through the forest. Leaves swirl around them as they pass.”
Using adjectives to imply scene motion tends to produce a more organic, integrated visual style. On the other hand, explicitly describing the scene motion tends to emphasize the environmental details more prominently. If insinuated motion doesn’t produce the intended effect, reinforce the action by adding further descriptive elements to emphasize specific environmental reactions clearly.
3. Camera Motion
Camera motion refers to how the viewpoint moves or is positioned within your scene. It significantly influences the viewer’s experience by emphasizing or complementing subject and scene motion. Clearly specifying camera motion enhances the cinematic or storytelling quality of your video. Common camera motion styles include:
- Locked camera: Fixed position, no movement.
- Handheld camera: Natural, slight movements suggesting realism.
- Dolly shot: Smooth linear movement toward, away from, or alongside subjects.
- Pan shot: Horizontal rotation left or right.
- Tilt shot: Vertical rotation up or down.
- Tracking shot: Camera following subject motion.
- Crane shot: Camera moves vertically and horizontally, typically from a raised viewpoint to a lower position or vice versa.
- Steadicam shot: Fluid, stable movements used to smoothly follow characters through complex environments.
- Zoom shot: Changing focal length to visually move closer or further from a subject without physically moving the camera.
- Rack focus: Shifting focus between foreground and background subjects to direct viewer attention.
- Drone/aerial shot: Capturing scenes from elevated heights, showcasing expansive environments or establishing geography.
- POV shot: Camera represents a character’s viewpoint, immersing the audience directly into their perspective.
- Over-the-shoulder shot: Camera positioned behind a character, typically framing interactions or dialogue.
- Dutch angle: Camera tilted diagonally to create visual tension, unease, or disorientation.
- Whip pan: Rapid horizontal camera movement creating motion blur; often used as a stylistic transition between shots.
- Push-in shot: Camera gradually moves closer to intensify emotional or dramatic effect.
- Pull-back shot: Camera moves backward slowly, revealing additional elements or context previously unseen.
- Orbit shot: Camera circles around the subject, emphasizing drama or significance.
Camera motion prompts can instruct the camera either to track specific subjects or to move independently through the environment. Additionally, clearly stating shifts in focus or changes in framing, such as “slow dolly-in” or “wide-angle panning shot,” guides the model effectively. Exploring and utilizing film industry-standard terminology helps achieve more precise and professional-looking results.
4. Additional Style Descriptors
Style descriptors provide essential details about the aesthetic or general visual tone of your scene. These descriptors can define the motion’s overall feeling, pacing, animation type, or visual style. Common style descriptors include terms like:
Motion Style Descriptors
- Smooth animation: Fluid, seamless motion emphasizing clarity and continuity.
- Stop-motion: Tactile, frame-by-frame animation with intentional imperfections.
- Live-action realism: Natural, authentic movements replicating real life.
- Stylized motion: Exaggerated or artistically modified movements for dramatic effect.
- Slow-motion: Movements shown at reduced speed for emphasis.
- Time-lapse: Accelerated motion capturing slow changes quickly.
- Hyper-realistic motion: Precise, detailed movements simulating near-perfect realism.
- Cartoon-like animation: Exaggerated, playful movements emphasizing humor.
- Cinematic realism: Choreographed, emotive motion mimicking film aesthetics.
- Abstract motion: Non-literal, interpretive movements evoking emotion or mood.
- Mechanical movement: Rigid, precise movements inspired by machinery.
- Organic movement: Free-flowing, natural movements inspired by living organisms.
- Retro animation: Nostalgic style mimicking older animation techniques.
- Glitchy animation: Deliberately distorted, disrupted motion suggesting technical flaws.
- Fluid simulation: Realistic or stylized liquid-like motions.
- Claymation style: Soft, handcrafted movements typical of clay-based stop-motion.
- Cut-out animation: Flat, layered 2D elements animated frame-by-frame.
- Sketch animation: Raw, evolving hand-drawn illustration style.
- Choppy motion: Abrupt, irregular movements conveying urgency or handmade feel.
Style descriptors may be integrated at the end of your prompt for clarity, or included directly in the main body as your prompt evolves. Typically, it’s most effective to introduce these stylistic elements after clearly defining subject, scene, and camera motion. This sequencing allows the model to first understand the foundational actions and movements clearly, then apply your intended visual style seamlessly to enhance the overall aesthetic impact.
Using Reference Images in Runway to Get More Consistency
Incorporating multiple still images as reference points is one of the best new features in Runway Gen-4, enabling you to achieve precise control over style, character consistency, and scene composition in AI-generated videos. By starting with carefully selected or crafted images—whether original photographs, AI-generated visuals, or existing stills—you can establish a visual foundation that guides the model toward your desired aesthetic.
To effectively use reference images in your video prompts, do the following:
- Curate or Create Reference Images: Begin by selecting or generating images that encapsulate the characters, settings, and objects you wish to feature in your video. These images will act as the foundational visual references for the AI model. For complex scenes, provide separate reference images for different components, such as character faces, costumes, and props. This granularity enhances the AI’s ability to accurately render each element.
- Upload Images to Runway: In your Runway project, upload the chosen reference images. Runway Gen-4 allows you to input multiple images, each serving a distinct purpose in defining elements like character appearance, wardrobe, or specific objects.
- Structure Your Prompt with reference tags: When putting together your text prompt, clearly reference the uploaded images to guide the AI’s interpretation. You can do this by typing the “@” symbol directly in the part of the prompt you want the model to refer to the reference image. When you type “@” a list of your uploaded reference images will appear. Select one and it will be referenced in that specific area of the prompt.
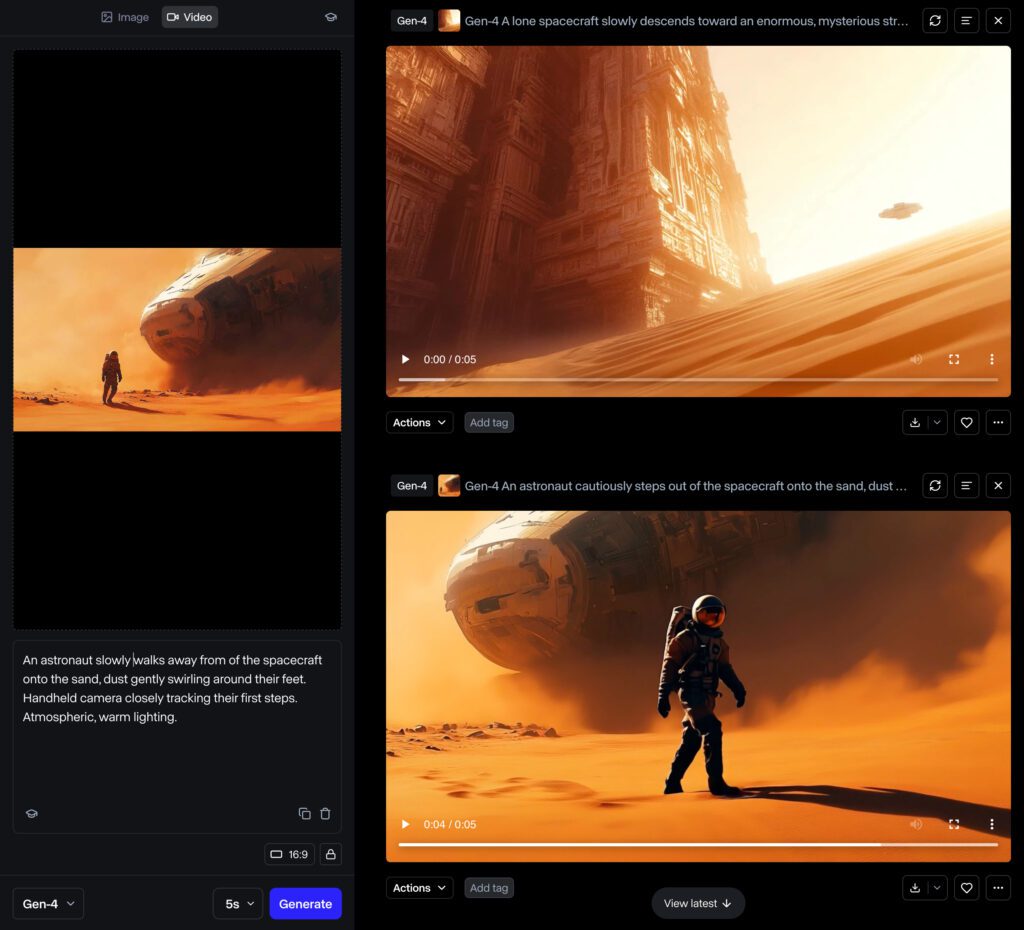
Example Prompt Sequence: Sci-Fi Short Film
Here is a sequence of example prompts that should be paired with an image.
A lone spacecraft slowly descends toward an enormous, mysterious structure partially buried in the vast sands of an alien desert. Slow dolly-in shot from above. Epic wide-angle landscape.
An astronaut cautiously steps out of the spacecraft onto the sand, dust gently swirling around their feet. Handheld camera closely tracking their first steps.
The astronaut walks steadily toward a giant structure as sand particles drift across its reflective metallic surface, reacting subtly to their approach. Locked camera captures this interaction.
The astronaut places their hand onto the structure’s smooth surface, triggering glowing symbols to emerge and pulse gently outward from the touchpoint. Close-up, slow dolly-in.
The ground beneath the astronaut vibrates lightly, sand shifting and falling away to reveal hidden steps descending into the structure. Steady handheld camera captures the sand falling away.
The astronaut carefully descends the newly revealed steps, illuminating gradually as they walk deeper inside. Tracking handheld camera follows downward movement.
Inside, the astronaut stands motionless in awe as walls activate with holographic projections of star maps and alien symbols. Locked camera frames astronaut surrounded by emerging projections. Dynamic, vibrant holographic visuals.
The astronaut reaches forward, rotating a floating holographic star map gently with their gloved hand. Close-up tracking of hand motion. Interactive, sci-fi hologram effects.
Suddenly, a bright energy beam activates from above, scanning the astronaut’s entire body. Slow-motion handheld shot capturing astronaut’s slight recoil. Intense, dramatic light scanning effect.
A transparent energy barrier dissolves, revealing a hidden central chamber ahead, filled with rows of humanoid figures in suspended animation capsules softly illuminated by pulsing blue lights. Slow dolly-in from behind astronaut.
The astronaut approaches one capsule closely, inspecting the sleeping figure inside, whose facial features become clearer—perfectly matching the astronaut’s own face. Steady handheld close-up.
The astronaut steps back slightly, their body language showing clear confusion as they look around at multiple identical faces in other capsules. Handheld camera captures subtle physical reaction.
A single capsule activates, opening slowly as its occupant steps forward, calmly mirroring the astronaut’s movements exactly. Locked camera.
Multiple capsules simultaneously open, dozens of identical astronauts stepping forward, each mirroring precisely the movements of the original astronaut. Smooth panning shot reveals expanding mirrored action. Dramatic, eerie synchronized lighting.
Drone-mounted camera smoothly pulls upward through the structure’s transparent dome, revealing identical structures scattered across the desert, each activating and glowing simultaneously, indicating a vast cloning network spanning the planet.
Additional Tips and Tricks
- Experiment with synonyms or slight phrasing adjustments to explore different visual outcomes.
- Use evocative verbs (e.g., glide, stumble, soar) to clearly define the nature and style of movements.
- Combine concise actions to balance clarity and creativity (e.g.,
The subject spins gracefully, transitioning from dance to running). - Maintain brevity for clarity, especially for scenes lasting only 5-10 seconds.
By following this structured approach, you’ll leverage the full potential of Runway Gen-4, creating stunning and coherent AI-generated videos.